Parameters and Controls
How every operator's parameters are laid out, and the four ways to drive them.
Select a node and its parameters fill the panel on the lower right. Every operator uses the same layout and the same per-parameter controls, so what you learn on one applies to all of them.
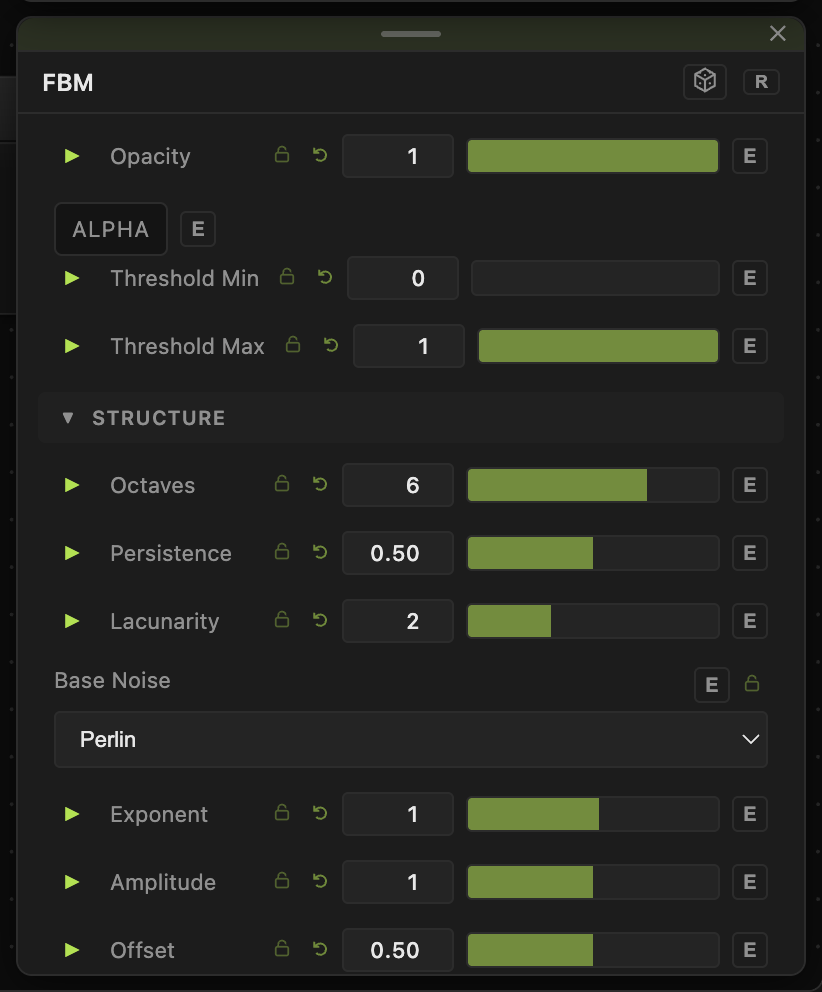
Panel layout
At the top, unlabelled, sit the controls every operator shares:
- Opacity — how much of this operator's result is used (0–1, default 1).
- Blend Mode — how it combines with what it composites over: Normal, Add, Multiply, Screen, Overlay, Difference, Subtract, Lighten.
- Alpha — derives the output's alpha from its luminance, so black becomes transparent. Invert Alpha appears once it is on and flips light for dark.
Generators add Threshold Min and Threshold Max here, which clip the output range for high-contrast results.
Below that, parameters are grouped into collapsible sections in a fixed order:
- Structure — what the operator makes: octaves, cell size, line width, sides, and so on.
- Transform — where it sits: Scale, Scale X/Y, Offset X/Y, Rotation.
- Dynamics — how it moves: Speed and other rate controls.
- Output — what comes out the far end.
- Field — collapsed by default.
Some operators rename these sections or add their own. Anything a section does not claim lands in Structure.
Two buttons sit in the panel header: a dice that randomizes every unlocked parameter, and R that resets everything to defaults.
The parameter row
Each parameter has, left to right: a chevron that opens the animation bar, the label, a lock, a reset, an editable value, the slider, a keyframe dot that drops a keyframe at the playhead and creates the timeline lane, and an E button. Vector rows carry their own reset and lock buttons.
- Lock — a locked parameter is skipped by the dice.
- Reset — returns that one parameter to its default.
- Value — click to type an exact number, or use the small arrows to nudge.
- E (expose) — publishes the parameter. Exposing it opens a timeline lane, adds an input port on the node, and makes it available to Perform mode, MIDI, and Base controls.
Brackets on the slider track set a clamp range. Animation and MIDI both work inside the clamp when you set one, so you can restrict a parameter to a range that looks good and then drive it freely.
Where the default sits on the track
Some sliders give the low end of their range more of the track than the high end. Speed controls are the clearest case: a Speed that runs 0 to 5 puts its 1× default in the middle, so half the track slows the motion down and half speeds it up. Without that, 1× would sit near the far left and every useful setting would be crowded into a sliver.
This changes only where the handle sits, never the value. A patch saved before or after reads back the same.
Animating a parameter

Click the chevron beside a label to open that parameter's animation bar. It runs an LFO on that one parameter, independent of everything else.
- Rewind / Play / Forward — run the animation backwards or forwards; the middle button starts and stops it.
- Loop mode — cycles Loop → Ping-Pong → Infinite. In Infinite the value never wraps and the clamp brackets are ignored.
- Easing — Linear, Ease In, Ease Out, Ease I/O.
- Speed — the readout with
−,+,/2, andx2beside it. Range 0.1 to 20.
When a parameter is being driven from elsewhere, the bar is replaced by a strip reading driven by connection or controlled by timeline, and the slider stops accepting edits.
The four ways to drive a parameter
- The animation bar — a per-parameter LFO, as above.
- A wire — drop the output of a Modifier operator onto a parameter to drive it from audio, MIDI, an LFO, an expression, or another node's value.
- MIDI — turn on Input → Enable MIDI Mapping, then click a parameter to bind it to the next control you move. The animation bar also grows a MIDI Learn button while MIDI is active. A binding learns over the clamp range if you set one, otherwise the full range.
- Audio — turn on Input → Enable Audio Mapping, then click a parameter to drive it from the incoming audio.
Regions and comments
Selecting a region shows its name, colour, and fill. Selecting a comment shows its text. Neither has operator parameters.
Troubleshooting
The dice skipped a parameter — it is locked. Click the lock to unlock it.
A parameter is missing — many parameters only appear when a related setting is on. Colour controls hide unless the operator's colour mode selects them, and per-type parameters hide unless that type is chosen.